Migrating my local SQL Database to Azure SQL (again)

I didn’t complete it

In my previous attempt to get my local SQL Server MediaLibrary into Azure, I left it incomplete. I truly didn’t realize that until I tried to connect SQL Server Management Studio (SSMS) to my database in Azure. It connected, but there was no data in any of the tables. My bad.

So let’s get this right. First, I deleted the database in Azure SQL. I don’t know if it is possible to do it any other way, but since it’s a small enough database I thought that would be all right. That and when I tried to upload it straight from SSMS, I got error messages about incompatibility. So in order to resolve this I decided to delete the previous instance from the Azure portal, to start over again. To do this I returned to the MSDN article SQL Server database migration to SQL Database in the cloud.

Starting Over Again

There are three steps you must take in order to migrate your local SQL database into Azure, they are:

  1. Test for compatibility
  2. Fix compatibility issues
  3. Perform the migration

I decided to use SQL Server Data Tools for Visual Studio (SSDT). This is for testing for compatibility. That led me to a link titled Migrate a SQL Server Database to Azure SQL Database using SQL Server Data Tools for Visual Studio.

WOW, in going through this I’ve discovered what step I left out. Its towards the end under “Fixing Compatibility Issues Using SQL Server Data Tools for Visual Studio”. I stopped short of doing step #4 which is updating the local target V12 compatible database and actually publishing the original data to the V12 compatible database.

(Someone, I can’t remember who nor where, asked me for my feedback on where in the Microsoft Azure documentation, did I leave off accidentally. I’m sorry, I can’t remember who you were, but it is here, in this Migrate a SQL Server Database to Azure SQL Database using SQL Server Data Tools for Visual Studio. I think it was because this article, to me, seemed to suggest that if I followed this article, I’d be done. I was mistaken in my interpretation, that is clear. And it was before this point where I stopped previously.)

Step 5 is a link back to Migrate a compatible SQL Server database to SQL Database. So I’m returning to the that article to select a migration method.

Migrating my SQL Server compatible database to Azure SQL

Because of my local video library database is small and I can control activity to it, I’m going to use the SSMS Migration Wizard. Selecting the link to migrate my compatible database I went to a page titled Migrate SQL Server database to SQL Database using Deploy Database to Microsoft Azure Database Wizard.

After getting back in SSMS I right mouse button clicked on the new V12 compatible database I created locally, and selected “Deploy Database to Microsoft Azure SQL Database” option under Tasks. That brought up a wizard to walk me through deploying the database.

At this point I started entering my Azure credentials, this time selecting a different name for the target database in Azure (just in case). I noticed that for the temporary file name the wizard is creating a .bacpac file. Interesting. So one way or other a BACPAC is used to perform the migration.

I’d like to point out that at this step the dialog box that I got for entering my initial credentials, didn’t look like what was in the article. Here’s what mine looked like:

Initial Publish Database screen

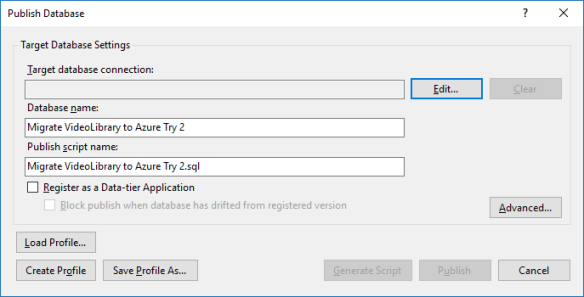
The instructions at step 6 talk about naming the database, setting the edition of Microsoft Azure SQL database, max database size, etc. Because this is an experimental database that I alone will be hitting against (maybe some of my family members will use it later on when I get to the point of writing an app to hit against it – I’ll blog about that as well), I am choosing Basic Edition, 2 GB of database size (that’s the max for basic anyway) and Service Objective of Basic.

Deploy Database screen

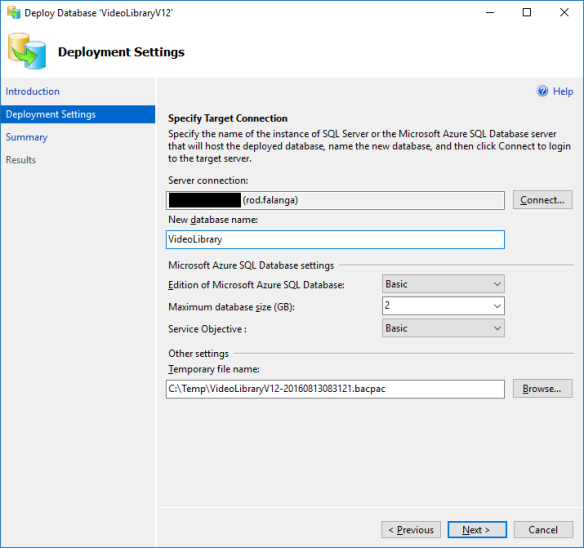
Clicking the Next button takes you to a summary. And here I can click on the Finish button which actually performs the migration of the database and data, into Azure SQL.

And here’s what the Deployment Settings window looked like:

Deploy Database screen

Verifying it worked

While still in SSMS I used Object Explorer to connect to my Azure SQL database to just make sure it worked.

It worked!


Connecting to Azure SQL using SSMS

OK, I’m used to accessing SQL Server databases using SQL Server Management Studio (SSMS). Tonight I found an article on the Azure website describing how to do exactly that. Check out Connect to SQL Database with SQL Server Management Studio and execute a sample T-SQL query.

Finally Got My Database into Azure!

I’m very pleased to say that I’ve finally gotten my local SQL Server database into Azure SQL!! The MSDN article that really helped was using this one titled SQL Server database migration to SQL Database in the cloud. This article lists various ways in which you can migrate you SQL Server database into Azure. (Note: it also references other types of databases.)

One of these methods was to use SQL Server Data Tools (SSDT), which I’ve got experience at using, so I decided on that one. The link to SSDT led me to a page titled Migrate a SQL Server Database to Azure SQL Database Using SQL Server Data Tools for Visual Studio. I found this to be very helpful!

Following the instructions on that last link I created a project in Visual Studio (using SSDT) to detect SQL Database V12 Incompatibilities. I had some V12 incompatibles (really, no surprise), but again following that last link’s instructions I eliminated the incompatibles.

Next I published my (slightly modified) database schema and data into Azure. At this point I created a new database and published it there. It asked me to create the firewall rules (this is where I specified my IP address). I’ve got it up there and have looked at the data through Visual Studio.

Learning Azure SQL

Recently I decided that I wanted to stretch myself by learning some new technologies. The “cloud” has been around for a few years now, but I haven’t yet used it, at least from a developer’s point of view. So I’ve decided to start with Microsoft’s Azure. I’m going to chronicle my learning experience here, if for no other reason than I’ll have something to refer to in the future. Smile

Since I’m doing this on my own, mostly on the weekends and whenever I can sneak in 30 minutes some weekday evening, I’ve had to ask around to learn how to do it. It was recommended to me that I take something I’ve used in the past and upload it to Azure. Years ago I started a SQL Server database at home, so that I could learn new (to me at least) technologies. (I used this to help me learn ASP.NET and WPF/XAML.) This database is for our fairly extensive DVD (and now Blu-ray) collection. I called it MediaLibrary.

The first thing I had to decided was how to get my MediaLibrary into Azure. I asked around and got two suggestions. First, I could create a VM in Azure, install SQL Server into it and upload my database into it. (What I believe is called Platform as a service, or PAAS.) This idea attracted me at first, but others suggested that doing this I really wouldn’t learn anything new. They recommended that I learn Azure SQL instead. (Infrastructure as a service, or IAAS.) So that’s the approach I’ve decided to follow.

A Useful Tutorial on Getting Started with Azure SQL

The first big help I got was to go to a link for a tutorial on how to do this, titled SQL Database tutorial: Create a SQL database in minutes using the Azure portal. I’m finding this to be a very helpful tutorial so I highly recommend it.

Single IP vs. Range of IP Addresses

Being a novice at this there are some obstacles I’ve run into. I read through the tutorial before starting. The first thing I ran into right away was where it said, “Create a server-level firewall rule for a single IP address or for a range of IP addresses.” Again I asked about this and was told that either I could get a static IP address or I could ask my ISP for the range of IP addresses they have. I thought that my ISP would have a huge range of IP addresses and I certainly didn’t want someone else potentially getting to my database in Azure, so I’ve decided to get a static IP address from my ISP. If you’re following this blog post, you have to make your own decision in regards to this. For myself I thought the static IP would work best.

Next Steps

Next I created a new SQL Server (logical server). As I understand it now, this is a place where a Azure SQL database can be put. You need this first before you can go on. When I entered all of the information required (see the link above to the tutorial) it took about 5 minutes to create after I clicked the Create button.

Next I went to create the Azure SQL database itself. This is as far as I’ve gotten. I’m now at the section titled, “Create a new Azure SQL database”. Where I’ve gotten stuck is selecting the source. The Select source dropdown has three options: Blank, Sample or Backup. I don’t want a blank database, as I’ve already got one. I don’t want a sample like AdventureWorks. Really the best choice for me is Backup, because I’ve backed up my MediaLibrary database. However this is where I’ve gotten stuck; selecting Backup makes Azure look only at itself for the backup. At least that’s the idea I’ve gotten. It certainly doesn’t give me the option to upload my .bak file. So, until I learn what I’m supposed to do next, I’m stuck. Hopefully I’ll learn later today. I’ll post after that.